Squarespace: How to Manage Individual DNS Records Added by Entri
Last updated: June 25, 2026
Overview
When Entri configures DNS records on a Squarespace-managed domain through Domain Connect, Squarespace groups all of those records together into a single block labeled Domain Connect to Entri. Inside that block, the records are read-only — Squarespace does not provide a way to edit, update, or delete them one at a time. The only available action on the block is to delete the entire group at once.
This guide walks you through the workaround for managing those records individually: copy the records elsewhere, remove the Domain Connect to Entri block, and re-add each record as a regular custom record in your Squarespace DNS Zone. Once the records live under Custom records, you can edit or delete each one independently.
Note: This is a limitation on Squarespace's side, not on Entri's. Entri publishes the records correctly, but Squarespace decides how they are displayed and managed inside your domain dashboard.
Before You Begin
Please read through the following points before starting:
You may experience a short service outage during the transition. Between the moment you delete the Domain Connect to Entri block and the moment your re-added records propagate, any service that depends on those records (custom email, SaaS integrations, domain verification, etc.) may stop working temporarily.
DNS changes can take 24 to 48 hours to fully propagate worldwide, although in most cases, changes resolve much faster. Plan to perform this workaround during a low-traffic period.
You will need your Squarespace account password (and your 2FA method, if enabled) to delete and add records. Squarespace requires reauthentication for any DNS change.
Copy every record carefully. A single missing character in a TXT, CNAME, or MX value can break the service the record is meant to support.
If you are unsure about any step, contact Squarespace directly before making changes. Entri does not have access to your Squarespace account and cannot view, edit, or manage your DNS Zone on your behalf. Squarespace's support team can — and they are the right team to help you navigate their DNS panel, recover from a misconfiguration, or confirm what a specific record should look like. You can reach them through the Squarespace Help Center.
Step 1: Copy All Records From the Domain Connect to Entri Block
Before removing anything, you need a complete copy of every record Entri added.
Open your Squarespace Domains dashboard.
Click the domain name you want to manage.
Click DNS, and then click DNS Settings.
Scroll down to the Domain Connect to Entri section.
For each row in that block, write down (or save to a text file / spreadsheet) the following columns: Type, Name, Priority, TTL, and Data.
Tip: If the Data column appears truncated, click the eye icon on the right side of the row to reveal the full value. Copy the entire string — extra spaces or missing characters will cause the record to fail once re-added.

Once you have a complete copy of every record, double-check it against the original block on screen. Do not move on until you are sure your copy is accurate.
Step 2: Delete the Domain Connect to Entri Block
After you have saved every record from Step 1, you can remove the block.
While still on your DNS Settings page, locate the Domain Connect to Entri section.
Click the red trash can icon in the top-right corner of the block.
Enter your Squarespace account password. If you have two-factor authentication (2FA) enabled, reauthenticate using your 2FA method and click Continue.
Confirm the deletion when prompted.

Warning: Once the block is deleted, the services that rely on those records may begin returning errors until you complete Step 3 and the new records propagate. Proceed to Step 3 immediately.
Step 3: Re-Add Each Record as a Custom Record
Now you will re-create each record from your copy in Step 1 as an individual custom record. Records added in this section can be edited or deleted one at a time.
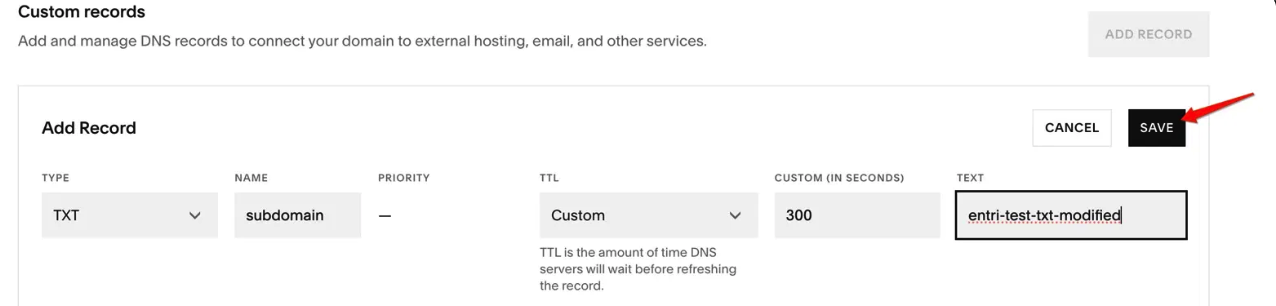
On the same DNS Settings page, scroll down to Custom records.
Click Add record.

Fill out the row using the values you copied in Step 1:
Type — select the record type (TXT, CNAME, MX, A, etc.).
Name — enter the subdomain or host. Enter
@if the record applies to the root domain.Priority — only required for MX records.
TTL — select a preset or choose Custom and enter a value in seconds. Squarespace defaults custom records to 4 hours; you can lower this to 300 seconds (5 minutes) for faster propagation if needed.
Data / Text / Mail Server — enter the value you copied from Step 1. The label of this field changes depending on the record type.
If this is the record you want to update, enter the new value here instead of the original one. Otherwise, paste the original value exactly as copied.

Click Save.
If prompted, enter your password (or reauthenticate with 2FA).
Repeat steps 2 through 6 for every record you copied in Step 1. When you are finished, each record will appear as its own row under Custom records, where you can edit or delete it individually at any time.
Verifying the Records
DNS changes typically resolve within a few minutes, but full propagation across the internet can take up to 48 hours. To check that your records are live, you can use a public DNS lookup tool such as DNS Checker and search for the specific record you just added.
If the service that originally required these records (for example, a custom email provider or a SaaS integration) offers its own "Verify" or "Validate" button, run that check once you confirm the records are visible in a public DNS lookup.
Why This Happens
Squarespace presents records added through Domain Connect as a single, grouped block rather than as individual entries. This is a design choice on Squarespace's side that applies to every Domain Connect provider, not just Entri. Entri publishes each record correctly through Squarespace's official Domain Connect API, but Squarespace does not currently expose those individual records for direct editing in the DNS panel.
The workaround above converts the grouped block into independent custom records, which Squarespace does allow you to manage one at a time.
Still Need Help?
If you run into any issues while following this guide, or if a record fails to save in Squarespace, please reach out to Entri Customer Support and include:
The domain you are working on.
A screenshot of the record(s) you are trying to add.
The exact error message Squarespace displays, if any.
We are happy to help you confirm that the records you are re-adding match what Entri originally published.